Using the Options Editor
An option lets a customer personalize a product: pick a finish, choose a bulb, type a name for engraving, upload a photo. Options can add to the price, but they do not track stock. For choices that need their own stock count, such as sizes or colors, use variations instead; see Product Variations and Options for the difference. Options are included on every plan.
Every shop now uses the Options editor described here, on the product form and in Option Templates. Your existing options carried over exactly as they were. There is nothing to switch on.
Turning Options on
If you do not see an Options box on your product form, go to Dashboard → Settings → Store Settings, find Variations & Options, check Enable Product Options and click Save Store Settings.
The editor on the product page
Edit any product and scroll to Options. Two buttons sit at the top:
- New option: build an option for this product only.
- Add from template: add an option you have already built once. See Option templates below.
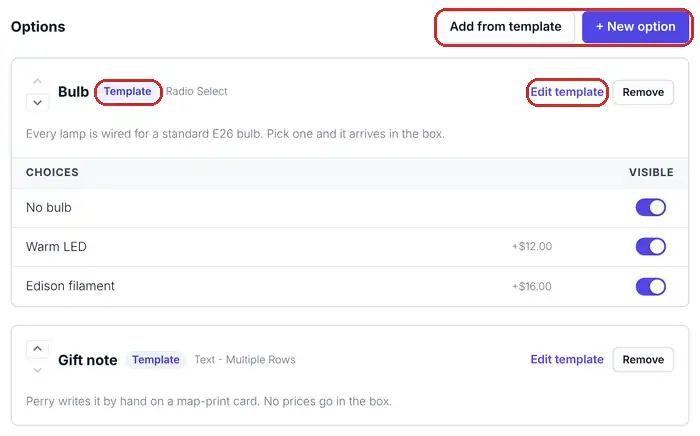
Nothing is saved until you save the product. If you change your mind, leave the page without saving.
Adding a new option: pick the type first
Click New option. The editor asks What kind of option is it? Pick one, and from then on it shows only the settings that type uses.

- Checkboxes: the customer ticks one or more choices. Good for add-ons like gift wrap and a card.
- Radio Select: the customer picks one choice from a list.
- Select List: the customer picks one choice from a dropdown. Good for long lists.
- Text: the customer types a short answer, like a name or initials.
- Text - Multiple Rows: the customer types a longer answer, like a message.
- File Upload: the customer uploads a file, like a photo or a logo.
Then fill in the option:
- Type the option name. Customers see it on the product page.
- Switch Required on if the customer must answer before adding to the cart.
- Add a Description if the customer needs a hint. It shows under the option name.
- Save the product.
Choices (Checkboxes, Radio Select and Select List)
Click Add choice and type its name. Press Enter to move to the next row; on the last row, Enter adds a new one, so you can type a whole list without the mouse. Each choice has:
- Price adjustment: added to the product price when the customer picks this choice, like 12.00 for a warm LED bulb. Use a minus sign to take money off. Leave it at 0.00 for no change.
- Photo (Radio Select and Select List): link the choice to one of this product's photos, and the product photo switches to it when the customer picks the choice. The photo must already be saved on the product, so upload it and save first.
- Visible: switch a choice off to stop offering it on this product without deleting it. Handy for a finish you are out of but will offer again.
- The trash icon removes the choice.
Drag the dotted handle at the left of a choice to change the order. Customers see the choices in this order.
Buttons and swatches for choices
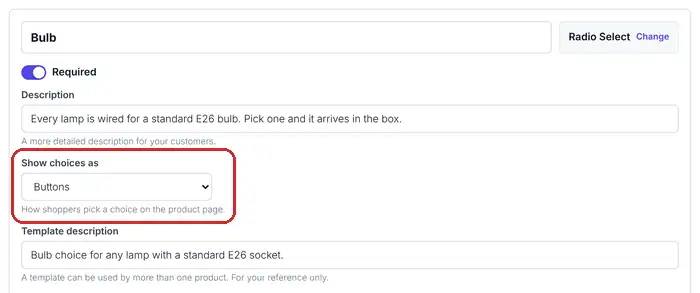
Show choices as sets how the choices look on your product page: the usual list or dropdown, Buttons, Color swatch or Image swatch. With a swatch, each choice gets a color or a small picture. See Showing Choices as Buttons, Color Swatches or Image Swatches.
Text options: character limit and additional charge
- Character limit: the longest answer a customer can type. Leave it blank to use your store default.
- Additional charge: charge extra when a customer fills the option in, like 5.00 for engraving. An option with a charge is always optional: the customer ticks a box to add it, so Required switches off and locks while a charge is set.
Changing an option's type
The type shows next to the option name. Click Change to pick another. You can always switch between the three choice types, or between the two text types. To switch between families, say from a Select List to a Text option, first remove what the new type cannot use: the choices, or the character limit and additional charge. The editor tells you what is in the way, so nothing is left behind out of sight. If something else needs fixing when you save, every problem is listed at once.
Reordering and deleting options
Use the up and down arrows at the left of an option to move it; customers see the options in this order. The trash icon next to the option name deletes the option from the product, after you confirm.
Option templates
If many products share the same option, such as gift wrap or engraving text, build it once as a template and add it to each product in one click.
Creating a template
- Go to Dashboard → Options.
- Click New option template.
- Pick the type, then set the name, choices and prices, the same way as on a product.
- Add a Template description if you like. It is a note for you; customers never see it.
- Save.
The Option templates list shows each template's type and choices and how many products use it. Use Edit to change one and Delete to remove it.
Saving an option on a product as a template
- Edit the product that has the option.
- At the bottom of the option, click Save as template.
- Add a description if you like, and confirm.
- Save the product. The option becomes a template when you do.
Using a template on a product
- Edit the product and click Add from template.
- Click each template you want, then Add to product.
- Save the product.
A template on a product shows a Template badge. Because other products share it, you change it in one place: click Edit template, and the change shows on every product that uses it. On the product itself you can still switch single choices off with Visible, and Remove takes the template off this product without deleting it.
Related: Buttons and Swatches · Product Variations and Options · Personalization: Custom Text and File Uploads · Using the Upgraded Variations Editor
Questions? Email support@indiemade.com.