Managing Product Categories
Categories organize your products into browsable groups so shoppers can find what they want without searching through your entire store. You can create a simple list, build categories and subcategories, add category photos, and decide where your category navigation appears.
Categories and the Category Manager are core IndieMade features available on every plan.
Open the Category Manager
- Go to your Dashboard.
- Click Categories.
The Category Manager has two sides. The category tree on the left shows your category structure, product counts, images, and whether each category is enabled. Select a category to edit its details on the right.
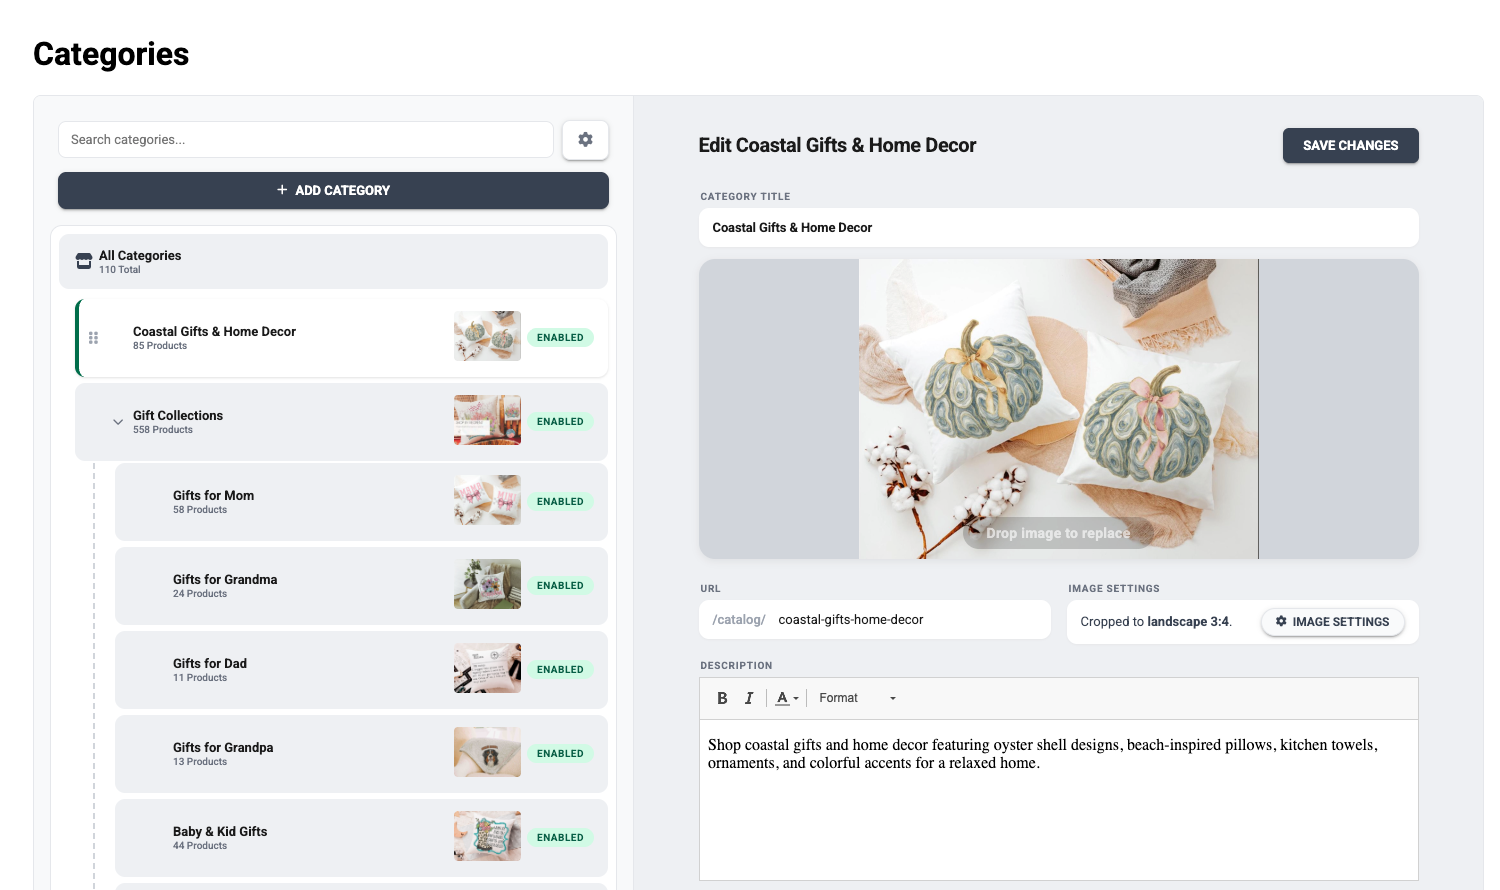
Use Search categories to find a category in a long list. Click the arrow beside a category to show or hide its subcategories.
Each row in the tree shows a grip handle for dragging, the category name, how many products it holds, a small thumbnail if the category has an image, and an Enabled or Disabled badge. Hold your mouse over a thumbnail to see a larger preview of the photo without opening the category.
Add a category
- Click Add Category.
- Enter a Category Title.
- Optionally upload an image and add a description.
- Review the URL. IndieMade makes one from the title, but you can change it.
- Leave Visibility set to Public if shoppers should see the category, or switch it to Hidden while you work on it.
- Click Create Category.
Add a subcategory
Select the category that should contain it, then click Add Subcategory. You can also create a category at the top level and drag it onto another category later.
Edit a category
Select a category in the tree. The editor opens on the right with the category image shown large at the top. You can change the Category Title, image, URL, Description, and visibility, then click Save Changes.
Three optional fields help shoppers and search engines find the category:
- Meta Description is the short summary search engines show for this category page.
- Call to Action is your own wording for the link that sends shoppers into the category, such as Shop all Necklaces. Leave it blank to keep the standard wording.
- Google Merchant Category and Google custom label only matter if you advertise with Google. Start typing to pick Google's own category name. A custom label travels with every product in this category in your product feed, so you can run a Google promotion on just those products. See Integrating Your IndieMade Products with Google Merchant Center.
The detail panel shows two useful counts:
- Products is the number assigned directly to this category.
- Total (including children) also counts products in its subcategories.
If the category contains products, click View Products to open a filtered product list.
Category images and photo shape
Drop an image onto the upload area, click to choose a file, or drop a new photo straight onto the large image and use Upload New Image to replace it. IndieMade optimizes the photo for you.
Click Image Settings to open Photo Settings and choose a shape: No Crop, Square, Portrait, Landscape, Tall, or Wide. The large image in the editor and every thumbnail in the tree update as soon as you save, so you can see the result without leaving the page.
Image Settings apply to every category image in your store, not only the category you are editing.
Organize categories and subcategories
Grab the grip handle at the left of a row and drag the category to change its order or nesting:
- Drop a category above or below another category to reorder it.
- To make it a subcategory, drag it over another category and pause for a moment. That category opens, and you can drop the one you are holding inside it.
- Drag a subcategory back out to the main list to return it to the top level.
Moves are saved as you make them, and the tree updates right away. A category cannot be moved inside one of its own subcategories.
Assign products to categories
Assign one product
- Go to Dashboard → Products.
- Add a product or edit an existing one.
- Open Categories and choose one or more categories.
- Save the product.
Assign several products at once
- Go to Dashboard → Products and select the products with the checkboxes.
- Click More Bulk Actions and choose Set Categories.
- Choose an adjustment:
- Set Categories replaces the products' current categories.
- Add Categories keeps their current categories and adds the ones you select.
- Remove Categories removes only the categories you select.
- Choose one or more categories and click Update Categories.
See Bulk Editing Products for the rest of the bulk tools.
Show, hide, and delete categories
Set a category to Public when shoppers should see it, or Hidden when it is not ready. The tree shows the same state as Enabled or Disabled.
You can also turn on Hide Empty Categories in Category Settings. This automatically keeps categories with no products out of your storefront while leaving them available in the Dashboard.
Category Settings
Click the gear at the top of the Category Manager to open Category Settings. These settings control your category pages and navigation across the store:
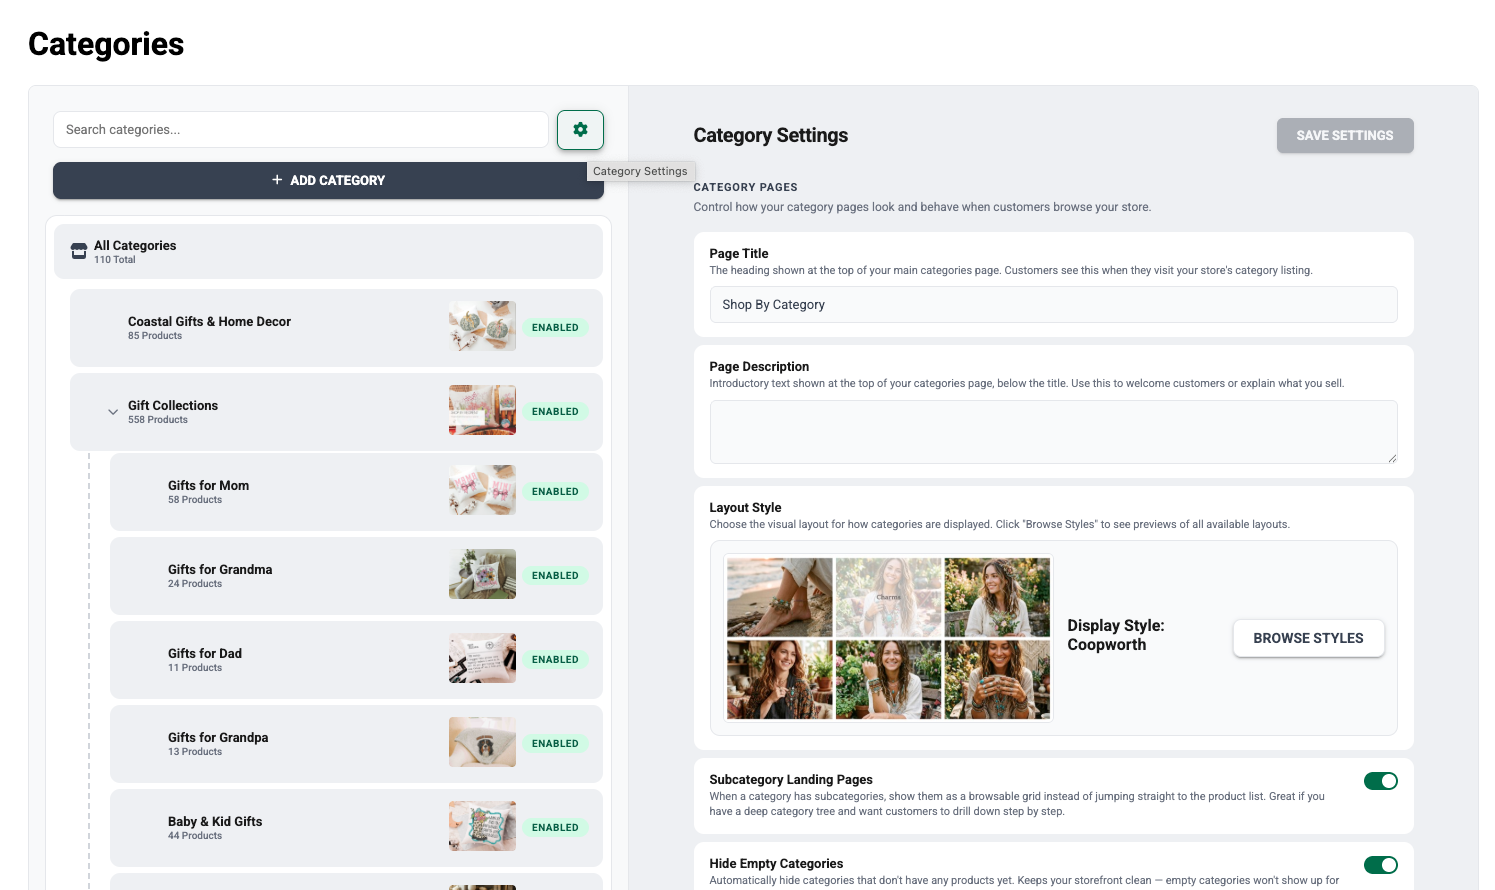
- Page Title and Page Description set the introduction on your main categories page.
- Layout Style changes the way category cards are arranged.
- Subcategory Landing Pages shows subcategories as a browsable grid so shoppers can move through a deeper category tree.
- Hide Empty Categories keeps categories with no products out of the storefront.
- Open Links in New Tab opens product and category links without replacing the page a shopper is viewing.
- Show Page Title on Homepage applies when the Categories page is your homepage.
- Category Navigation controls the separate Category Menu on store and category pages.
- Main Menu Categories places categories inside your site's main navigation.
Change category settings from your storefront
You do not have to return to the Dashboard to adjust the display. While signed in, visit your main categories page or any category page on your site and click the Settings gear in the bottom toolbar.
The Display tab controls your store-wide category defaults, including layout, title and text sizes, spacing, the main category-page title and description, subcategory behavior, category-menu design and colors, main-menu categories, and category-image cropping. These are the same settings used by the Dashboard, so changes stay in sync.
When you open Settings from a particular category page, an Advanced tab also appears. It lets you choose a different display for that category instead of using the store-wide default. This is useful when the normal display does not suit one collection, or when a seasonal collection, sale, or gift guide should become a more distinctive landing page. Bellwether currently supports the fullest set of category-specific page and card fields; some Advanced fields may not affect other display styles yet. IndieMade is continuing to expand this support.
See Using a Different Display for One Category for the complete guide.
Category Menu and Main Menu Categories are different
- Category Menu is a separate category navigation area shown on store and category pages. You can place it above the header, below the header or above the products, or in a left sidebar, depending on your design. Choose from Classic, Basic, Atelier, Slab, or Dropdown styles.
- Main Menu Categories puts categories directly in your site's main menu alongside Home, About, and your other pages. Choose Off, Single menu item, or Each top-level category. A single item can be named Shop, Categories, Browse, or anything you prefer, and categories can appear before or after your other menu items.
See Adding Your Categories to Your Main Menu for the full Main Menu Categories guide.
Need more help? Contact support@indiemade.com.