Creating a Photo Gallery and Choosing Its Layout
A gallery is a page of pictures: your portfolio, past commissions, a craft fair booth, work that has sold, photos customers send you. Galleries are separate from your products, so a gallery picture never needs a price. Every IndieMade site has galleries built in, on every plan.
Creating a gallery
- Go to Dashboard → Galleries and click Add Gallery.
- Type a Title and, if you like, a description. The description shows above the pictures.
- Click Upload Images next to Gallery Images. To pick several files at once, hold down Ctrl (Windows) or Command (Mac) while you click them.
- Click Save.
Upload your pictures at their own shape. You do not need to crop them square first; the layout you choose below decides how they line up.
Titles, descriptions and links on each picture
- On the gallery's edit page, point at a picture and click the document icon.
- Add a title and a description. The description also helps search engines and screen readers.
- URL sends a click on the picture somewhere else, such as the matching product, instead of opening the slideshow. Tick Open link in a new window to open it in a new tab.
- Click Save.
To remove a picture, point at it and click the trash can.
Choosing a layout
Open any gallery on your site while you are signed in and click the Settings gear in the bottom toolbar. Gallery Display Settings opens. The layout is the same for every gallery on your site.
- Under Layout Style, click Browse Styles.
- Click Choose under the layout you want. Each one has a preview picture and a line about what it does.
- Click Save. The page reloads in the new layout.
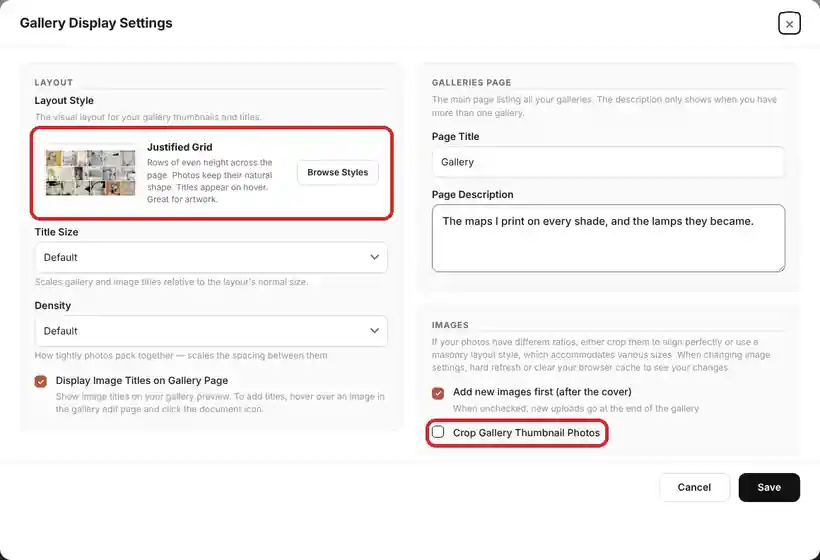
The same choice is also on Dashboard → Settings → Gallery, as Gallery Display Style. Both places change the same setting.
Which layout to pick
- Grid layouts, such as FarmHouse, Rooster and Coopworth, show every picture the same size in neat rows. They look best when your pictures are all one shape, or when you tick Crop Gallery Thumbnail Photos to trim them to one shape.
- Masonry layouts, such as Glaze, Gentoo, Ochre and Surreal, keep each picture's shape and stagger the columns, like Pinterest.
- Justified Grid keeps each picture's shape and lines them up in rows of the same height. More on it below.
Justified Grid: work of every shape, in even rows
Painters, photographers and printmakers rarely have pictures that are all one shape. A tall portrait, a wide landscape and a square study do not fit a normal grid without cropping. Justified Grid fixes that. Every row is the same height, and each picture is as wide as its shape needs, so nothing is cut off and the rows still finish flush at both edges. Galleries on many artist sites look like this.

To use it, choose Justified Grid in Browse Styles as described above.

What visitors see
- On a computer, the grid runs the full width of the window with a margin down each side. A laptop shows about three pictures a row; a big monitor fits more.
- On a phone, the rows are shorter, so about two pictures fit across.
- Picture titles appear in white over the bottom of a picture when a visitor points at it. Phones have nothing to point with, so they do not show titles over the pictures. Clicking a picture still opens the full-size slideshow, title included.
- The gallery list page, the page that shows all your galleries when you have more than one, shows each gallery's cover three across.

Getting the best out of Justified Grid
- Leave Crop Gallery Thumbnail Photos unticked. The point of Justified Grid is that every picture keeps its own shape.
- Mix your shapes. If every picture is the same shape, Justified Grid looks just like a plain grid. Its strength shows when tall and wide work sit together.
- Add titles to your pictures if you want visitors to see them on hover. A picture with no title shows nothing over it.
- Turn off Display Image Titles on Gallery Page in the same dialog if you want clean pictures with no titles at all.
- Your shop can use Justified Grid too. See Product Page Layouts and Store Layout Styles.
The other gallery settings
These are in the same Gallery Display Settings dialog:
- Title Size makes gallery and picture titles larger or smaller than the layout's normal size.
- Density sets how tightly the pictures pack together.
- Display Image Titles on Gallery Page shows or hides picture titles.
- Galleries Page: the Page Title and Page Description of the page that lists all your galleries. The description only shows when you have more than one gallery.
- Add new images first (after the cover) puts new uploads at the front of a gallery. Untick it to add them at the end.
- Crop Gallery Thumbnail Photos trims every picture to the same shape. Pick the shape after you tick it. This is for grid layouts; leave it off for masonry and Justified Grid.
After changing picture settings, refresh your browser (or clear its cache) to see the new pictures.
Search engines
IndieMade fills in the search title, description and web address of each gallery from its title and description. To word them yourself, open the SEO section on the gallery's edit page. See SEO on IndieMade.
Putting a gallery in your menu
- On the gallery's edit page, tick Provide a menu link.
- Type the Menu link title.
- Under Parent link, choose <IndieMade Site Menu> for your header or <Footer> for your footer.
You can reorder menu links later in Menus.
Questions? Email support@indiemade.com.