Setting up a Custom Domain with IndieMade
Connecting a custom domain to your IndieMade site lets customers visit your store at your own web address (like www.yourshop.com) instead of yourshop.indiemade.com. The setup includes a free security certificate (the padlock), and custom domains are included on every plan.
There are three steps to connect your domain:
- Add a CNAME record at your domain registrar that points
wwwto your IndieMade URL (e.g.,yourshop.indiemade.com). - Set up a redirect so visitors who type your domain without “www” (like yourdomain.com) are automatically sent to www.yourdomain.com.
- Tell IndieMade about your domain: on the Custom Domain page in your Dashboard if your shop has it, or at account.indiemade.com.
Start in your Dashboard, if your shop has the Custom Domain page
Click IndieMade Settings in your Dashboard. If you see Custom Domain in the list, your shop has a page that walks you through the whole thing and checks your work as you go. Use it; it is the quickest way. If you do not see it, follow the three steps further down this page instead.
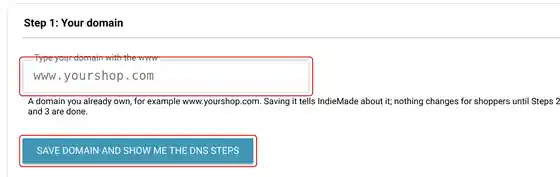
- Step 1: Your domain. Type your domain with the www, for example www.yourshop.com, in Type your domain with the www and click Save domain and show me the DNS steps. Nothing changes for shoppers yet.
- Step 2: Point your domain at IndieMade. The page now shows two changes to make at the company where you bought the domain, filled in with your own addresses: the www record (a CNAME) and forwarding for the bare domain. Make them there, come back and click Check again. Under What we see right now, each change says Done or Not yet, and tells you what is wrong if a record points somewhere else.
- Step 3: Security certificate (we do this). Once your www record reaches us, IndieMade installs the padlock certificate for you. It runs twice a day, so allow up to 12 hours. The banner at the top of the page turns green and says your domain is live and secure.
Stuck on Step 2? At the bottom of the page, Ask IndieMade to manage my DNS lets us run your domain's DNS for you, free. Tell us where you bought the domain, and we email you within one business day with four nameservers to enter there. We keep your email records working.
Your IndieMade address keeps working the whole time, so you can always reach your Dashboard. Once your domain is live, you can send shoppers who use the IndieMade address on to your own domain with the switch under Settings → SEO Settings; see SEO on IndieMade.
The three steps by hand
Shops without the Custom Domain page, or anyone who wants to know what the page is doing, can follow these steps.
Step 1: Add a CNAME Record
A CNAME record tells the internet to direct traffic for www.yourdomain.com to your IndieMade site. You create this record in the DNS settings at your domain registrar.
- Type: CNAME
- Host / Name: www
- Value / Target: your IndieMade URL (e.g.,
yourshop.indiemade.com) - TTL: leave at the default
www in your DNS settings. An A record for www will conflict with the CNAME and prevent it from working. Delete any www A record before adding the CNAME.Step 2: Set Up a Redirect (Root Domain to www)
When someone types yourdomain.com (without www), they need to be redirected to www.yourdomain.com where the CNAME points. This is called a root-to-www redirect or domain forwarding.
The exact steps depend on your registrar, but the general idea is:
- Forward from: yourdomain.com
- Forward to: https://www.yourdomain.com
- Redirect type: Permanent (301)
Most registrars have a “Forwarding” or “Redirect” option in their domain settings for this.
Step 3: Add Your Domain to IndieMade
If your Dashboard has IndieMade Settings → Custom Domain, add your domain there (see the top of this page). Otherwise:
- Go to account.indiemade.com and log in.
- Your login for account.indiemade.com may be different from your main IndieMade site login. If you cannot remember your password, use the password reset link on the login page.
- Add your custom domain in your account settings.
- IndieMade installs a free security certificate (the padlock) for your domain automatically once your www record points at us. This can take several hours.
Registrar-Specific Guides
We have step-by-step guides for the most popular domain registrars:
After Setup
DNS changes can take anywhere from a few minutes to 48 hours to fully propagate. During this time, your site may be accessible at some locations but not others. Once propagation is complete:
- Your site will be available at www.yourdomain.com with a secure HTTPS connection.
- Visitors who go to yourdomain.com (without www) will be automatically redirected.
- Your IndieMade dashboard will continue to work at your original .indiemade.com address.
Troubleshooting
- Site not loading on your domain? Double-check that the CNAME record for
wwwpoints to your exact IndieMade URL. Make sure there is no conflicting A record forwww. Allow up to 48 hours for DNS propagation. - Works with www but not without? Your root-to-www redirect is not set up or has not propagated yet. Check the forwarding settings at your registrar.
- Certificate warning? The certificate is installed automatically after your www record points at IndieMade, and that can take several hours. If it has been more than a day and you still see a warning, contact support@indiemade.com.
- Cannot log in to account.indiemade.com? Your account.indiemade.com credentials may differ from your site login. Use the password reset link on the login page.
Questions? Email support@indiemade.com.