Order Workflow & Stages
Every order in your store moves through a series of stages from checkout to completion. By default, IndieMade uses a standard set of order statuses. If you want more control, you can enable custom order stages to rename the steps, add your own intermediate steps, and build a workflow that matches how you actually fulfill orders.
Default Order Statuses
Without custom stages enabled, these are the statuses used to track your orders:
| Status | What It Means |
|---|---|
| In Checkout | The customer has a cart in progress or started checkout but didn't complete it. This is typically either an active shopping session or an abandoned cart. Tip: You can send automatic reminders to customers who abandon their carts — set this up in Store Settings → Abandoned Cart. |
| Payment Pending | Order was placed using a manual payment method you've defined — such as check, money order, cash on pickup, or bank transfer. The order is waiting for you to confirm payment was received. |
| Payment Received | Payment has been confirmed. This is where most orders start — when a customer pays with Stripe, PayPal, or Square, the order lands here immediately. |
| Processing | You are working on the order — packing, making, or preparing it for shipment. |
| Completed | Order is finished and shipped or picked up. |
| Canceled | Order was canceled. |
You manage these statuses yourself from the order detail page. The system uses them internally to track where an order is in your process — for example, an order starts in checkout status when the customer begins the checkout flow, and moves to a payment status once they submit their order.
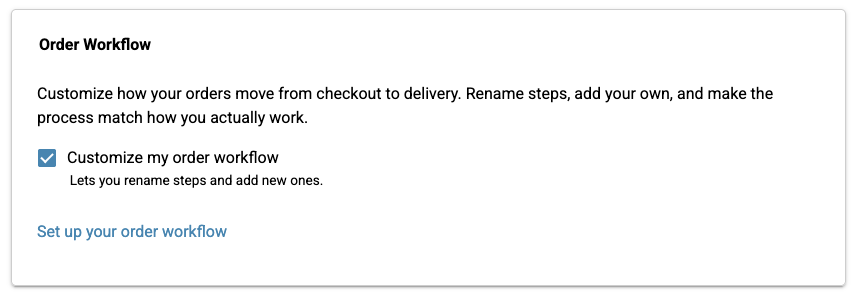
Enabling Custom Order Stages
If the default statuses are not enough, you can enable custom stages to add your own steps to the workflow.
- Go to Dashboard → Settings → Store Settings.
- Scroll to the Order Workflow section.
- Check Customize my order workflow.
- Save your settings.
- Click the Set up your order workflow link to configure your stages.
The Workflow Settings Page
The workflow settings page (Dashboard → Settings → Order Stages) shows your entire order pipeline as a visual timeline. Each of the 6 system stages is shown with its color, label, and a description of what it does.
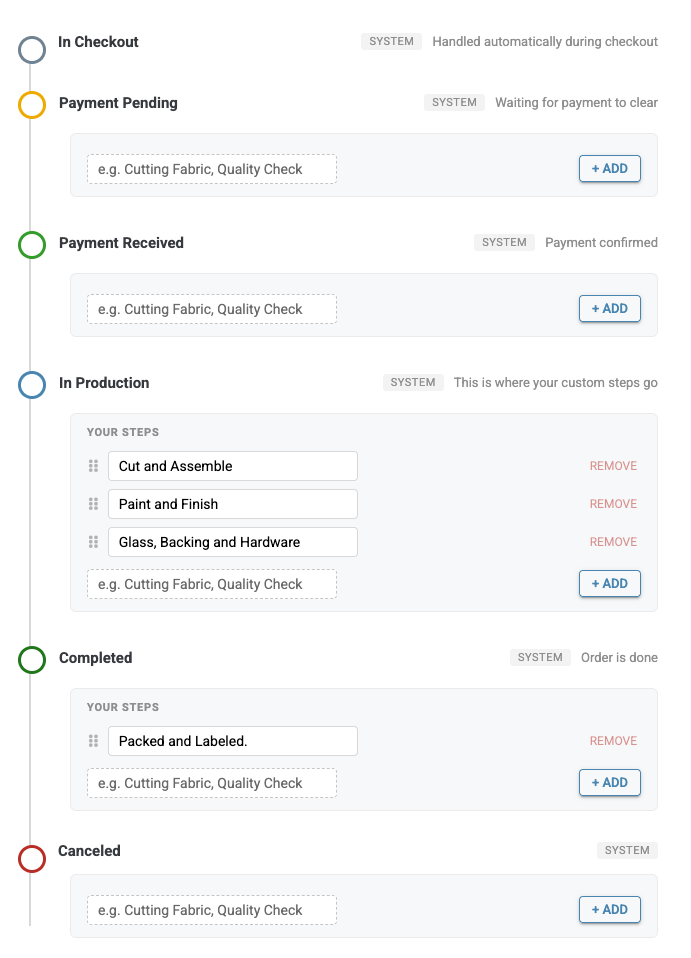
Renaming System Stages
System stages can be relabeled but not deleted. For example, rename "Processing" to "In Production" or "Completed" to "Shipped" — whatever fits your business. This is purely cosmetic: renaming a stage changes its label throughout your dashboard but does not affect how orders work behind the scenes. Payments still process the same way, emails still send at the same points, and integrations still behave normally.
The In Checkout and Canceled stages cannot be renamed since they are handled automatically by the system.
Adding Custom Steps
Under each stage (except In Checkout), you'll see a Your Steps area where you can add intermediate steps. Click + Add, type a name, and your step is added. These steps let you track the detailed progress of an order within a stage — for example, adding "Cut and Assemble," "Paint and Finish," and "Glass, Backing and Hardware" as steps under your production stage.
Removing and Reordering Steps
Click Remove next to any custom step to delete it. Drag steps by their handle to change the order within a stage. Click Reset to defaults to remove all custom steps and restore original labels.
System Stages vs. Custom Steps
The 6 core stages (In Checkout, Payment Pending, Payment Received, Processing, Completed, Canceled) are system stages — they always exist and cannot be deleted. They are marked with a "System" badge in the settings.
Any steps you add are custom steps that sit underneath one of the system stages. They represent intermediate checkpoints within that phase of the order.
Example: A Custom Workflow
In the screenshot above, the store owner has renamed "Processing" to "In Production" and added custom steps to track each phase of their work. Here's what their workflow looks like:
| Stage | Custom Steps |
|---|---|
| In Checkout | (none) |
| Payment Pending | (none) |
| Payment Received | (none) |
| In Production (renamed from Processing) | Cut and Assemble, Paint and Finish, Glass Backing and Hardware |
| Completed | Packed and Labeled. |
| Canceled | (none) |
When they open an order, they can move it through these steps one by one as work progresses — from Cut and Assemble through to Packed and Labeled.
How Stages Work with Orders
On the Order List
Each order shows its current stage as a color-coded badge. The colors help you scan your order list quickly:
- Gray — In Checkout
- Amber — Payment Pending
- Green — Payment Received
- Teal — Processing
- Blue — Completed
- Red — Canceled
Custom steps inherit the color of their parent stage. For example, "Cut and Assemble" under In Production will show in teal.
On the Order Detail Page
When you open an order, the status dropdown shows all available stages grouped by their parent stage. Select the stage you want and save. If you move an order to a custom step under a different parent stage, the order's underlying status changes automatically. For example, moving an order from "Glass Backing and Hardware" (under In Production) to "Packed and Labeled" (under Completed) automatically marks the order as completed.
Stage Assignment
When you have custom stages enabled, you choose which stage an order is in. Move orders through your custom steps as you work on them — the system doesn't advance orders through your custom steps on its own. That's the whole point: you control the workflow.
Tips
- Start simple. You can always add more custom steps later as your process evolves.
- The Processing stage is where most custom steps belong — this is your production and fulfillment phase.
- You can bulk update multiple orders to the same stage at once from the orders list.
- If you use integrations like Printify or Etsy, orders synced from those services will be assigned to the system default stage for their current status. You can then move them to your custom steps as needed.