Getting to Know Your IndieMade Dashboard
Your Dashboard is where you run your shop: products, orders, pages, design and every setting. Your site itself has a small toolbar too, so you can edit what you are looking at without leaving the page. Both are included on every plan.
Getting there
Sign in with the Log in link in the footer of your site, using the email address you signed up with and your password. You land on your Dashboard. If you cannot sign in, see How do I log in to my IndieMade website?
A tour of the Dashboard
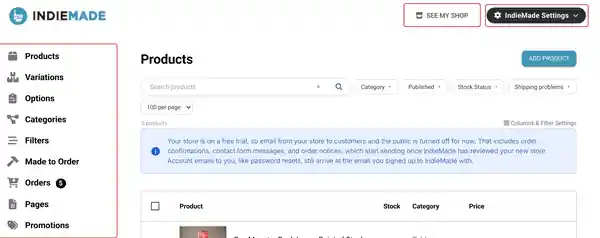
The menu down the left
This is everything in your shop. The ones most shops use every week:
- Products, Variations, Options and Categories: what you sell and how it is organized. See How to Add a Product.
- Orders: the number beside it is how many orders are waiting for you. See Orders.
- Pages, Blog Posts, Galleries and Menus: the rest of your site.
- Promotions, Reviews, Analytics and Reports: selling more and seeing how you are doing.
- Design: your theme, header, fonts and colors.
- SEO, Contacts and Users: search engines, messages from your contact form, and your customers' accounts.
Some items appear only once you turn the feature on. Filters, Made to Order and Private Listings come with their add-ons, and Back in Stock appears when back in stock emails are on. Add-ons are under IndieMade Settings → IndieMade Add-ons.
See My Shop
Click See My Shop at the top, or the IndieMade logo at the top left, to open your site. You stay signed in, so the toolbar (below) is waiting at the bottom of the page.
IndieMade Settings
Click IndieMade Settings at the top right for every settings screen: Plan & Billing, Basic Site Info, Store Settings, Payment providers, Taxes, Shipping, Integrations, IndieMade Add-ons, SEO Settings, Google Analytics, Advanced and more. Account and Log out are at the bottom of the list.

Your plan and billing
IndieMade Settings → Plan & Billing shows your plan, or the days left in your free trial. You can choose a plan, monthly or yearly, add or change your payment method, and see your past payments there. See Your Account: Email, Password and Plan.
The toolbar on your site
While you are signed in, a toolbar sits along the bottom of every page of your site. Shoppers never see it.

- Editor: turns on editing right on the page, so you can type over headings and text and add sections. See Editing Your Site Right on the Page.
- Settings: on store, product, category, gallery and blog pages, opens the display settings for that kind of page. See Display Settings.
- Edit Page, Edit Product or Edit Blog Post: opens the full edit form for what you are looking at.
- Dashboard: back to your Dashboard.
- The × at the right tucks the toolbar away. Click the round IndieMade logo at the bottom left to bring it back.
No toolbar? You are not signed in, or you are looking at your site in another browser. Sign in and it comes back.
More than one site
Each IndieMade site has its own Dashboard and its own sign-in. Your email is usually the same on each, but a password you change on one site does not change on the others.
Need help?
The bar across the top of the Dashboard links to these help pages. Email support@indiemade.com or use the chat window at the bottom of the Dashboard.