Basic Site Info: Logo, Site Name, Homepage, Email and Favicon
Basic Site Info is where your shop gets its name and face: the logo, the name in your header and in Google, which page opens when someone visits, the email address replies go to, the line at the foot of every page and the little icon in the browser tab. It is included on every plan, and most shops fill it in once, on the first day.
Open it from the IndieMade Settings menu at the top right of your Dashboard: Settings → Basic Site Info.
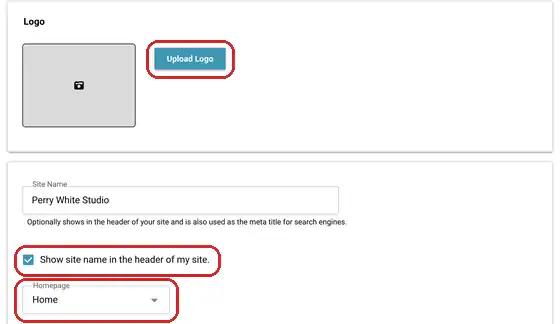
The settings
- Logo: click Upload Logo and choose your logo file. No logo yet? Leave it empty and your site name shows in its place. To change its size in the header, see Header Design.
- Site Name: your shop's name. It can show in your header, and search engines use it as the title of your shop.
- Show site name in the header of my site.: untick this if your logo already spells out your name, so it does not appear twice.
- Homepage: the page visitors land on: your store, your categories, your blog, your galleries or any page you have made. For a designed front page, build a page with the Section Builder and pick it here.
- Site Email: the address customers reach when they reply to an email from your shop, such as an order confirmation.
- Footer Text: the line at the bottom of every page. Text in brackets is filled in for you: [date:html_year] becomes the current year and [commerce_store:name:value] becomes your site name, so a copyright line never goes out of date.
- Website Icon (Favicon): the tiny picture in the browser tab and in bookmarks. Click Upload and choose a simple, bold image; detail disappears at this size. Most image types work, and 32 by 32 pixels is ideal, though a bigger image is scaled down. See How to Add or Update a Favicon.
Save at the bottom of the page when you are done.
Looking for the cookie banner? Once the Cookie Consent Banner add-on is installed, a Cookie Banner section appears at the bottom of this page and on Settings → Store Settings. It is the same setting in both places, so change it in whichever you are on; see Adding a Cookie Consent Banner. Your homepage title and description for Google live on Settings → SEO Settings; see SEO on IndieMade.
New shops: why customer email is off at first
While a new shop is on its free trial, a blue note at the top of this page explains that email from your shop to customers and the public is turned off for now. That includes order confirmations, contact form messages and order notices. They start sending once IndieMade has reviewed your new shop. Account emails to you, such as password resets, always arrive at the email address you signed up with.
Tips
- Use an email address you check every day for Site Email. Customers reply to order emails with questions about their order.
- A logo on a transparent background (PNG) looks right on any header color.
- Keep your site name the name customers know you by. It is what Google shows as your shop's title.
Questions? Email support@indiemade.com.