How Your Photos Are Resized and Cropped
"Why do my photos look cut off?" is one of the questions we hear most. This page explains what IndieMade does to your photos and the settings that control it. Everything here is included on every plan.
Resizing: always, and it is a good thing
When you upload a photo, IndieMade keeps your original and makes smaller copies for each place it is shown: a small one for the store grid, a bigger one for the product page, and so on. Small copies load fast, which matters a lot on phones.
The largest copy we ever show is about 2,000 pixels wide, the width of a big monitor. You can upload bigger photos, but it will not make them look sharper. A photo 2,000 to 3,000 pixels on its long side is plenty.
Cropping: your choice
Cropping trims photos to one shape so they line up neatly in a grid, like ducks in a row. The shape is called the aspect ratio: the width compared to the height.
- Square: as wide as it is tall.
- 3:4: a little wider than tall (or a little taller than wide, in portrait), like a classic print.
- 2:3: the shape of most camera photos.
- 9:16: long and narrow, the shape of a phone screen.
Each one can be laid out as Landscape (wider than tall) or Portrait (taller than wide). Cropping cuts from the edges and keeps the middle, so keep your piece near the center of the photo.

Should I crop?
If your photos are mostly the same shape, yes: pick that shape and the grid will look tidy. If your work comes in every shape (tall vases next to wide platters, framed prints in both directions), turn cropping off so nothing is cut.
With cropping off, choose a layout made for mixed shapes. Justified Grid lays photos in rows of the same height, each keeping its own shape. Glaze, Ochre, Sultan and Surreal also suit mixed shapes. You pick the layout under Layout Style in the same Settings dialog.
Where the crop settings are
Each kind of photo has its own setting, found in the Settings dialog of the page it appears on. Open the page on your site while signed in and click Settings in the bottom toolbar. Each dialog has an Images box:
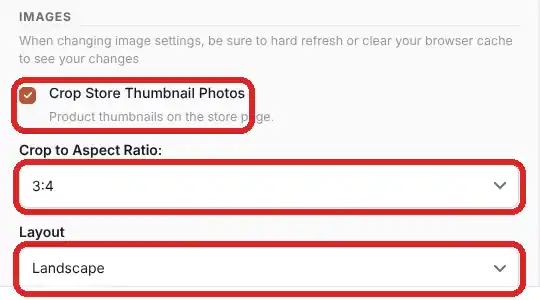
- Store page (Store Display Settings): Crop Store Thumbnail Photos, the product photos in your store grid.
- A product page: Crop Product Image Photos for the big photo and Crop Product Thumbnail Photos for the small ones under or beside it.
- A category page: Crop Category Image Photos, the category pictures.
- A gallery page: Crop Gallery Thumbnail Photos, the photos in your galleries.
Tick the box to crop, then pick Crop to Aspect Ratio: (Square, 2:3, 3:4 or 9:16) and the Layout (Portrait or Landscape). Untick it to show every photo in its own shape. Click Save.
Your photos are re-cut from the originals each time you change these, so nothing is lost; switch cropping off and the full photos come back. Your browser may keep showing the old copies for a while, so reload the page with a hard refresh (Ctrl+Shift+R, or Cmd+Shift+R on a Mac) to see the change.
For the rest of these dialogs, see Display Settings.
Tips
- Shoot with a little space around your piece. Then any crop keeps all of it.
- Use the same shape for every product's first photo. That one shows in the store grid.
- Blog post photos and the pictures in sections are not cropped by these settings.
Questions? Email support@indiemade.com.