Bulk Editing Products
The bulk editing tools let you make changes to many products at once. Instead of editing each product one by one, you can select a group of products and apply the same change to all of them in a single operation. Reprice a whole category, fix a typo in every description, set shipping sizes for a batch of prints, or move products to a new category in one step.
Getting Started
- Go to your Dashboard → Products.
- Use the checkboxes on the left to select the products you want to edit. The checkbox in the header row selects every product on the current page.
- To go beyond the current page, click Select all … products in the toolbar. This selects every product that matches your current search and filters, not just the ones on screen.
- Choose an action from the toolbar: Publish, Unpublish, Delete, or click More Bulk Actions for the full list.
- A dialog opens where you set up the change. The button at the bottom tells you how many products it will touch, for example Update Prices on 12 Products.
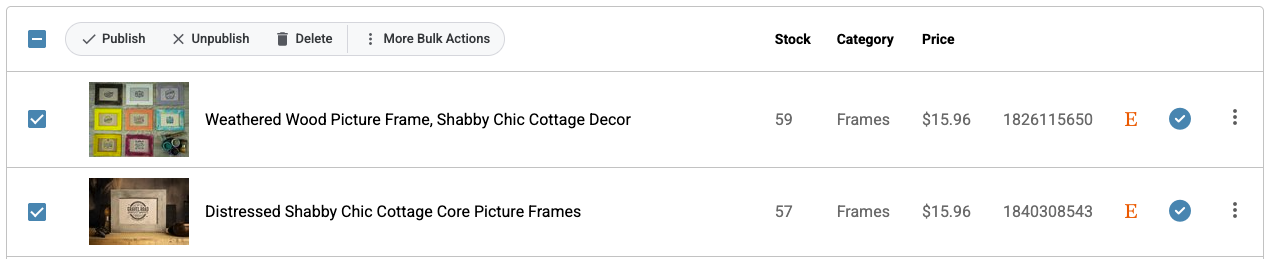
Filter your product list first using the search box, the category dropdown, stock status, or published status. Bulk editing is quickest when you narrow the list to exactly the products you mean to change, then select them all.
Quick Actions
These are available directly in the toolbar above your product list:
- Publish — Makes the selected products visible on your website.
- Unpublish — Hides the selected products from your website without deleting them.
- Delete — Permanently removes the selected products. You will be asked to confirm before anything is deleted.
More Bulk Actions
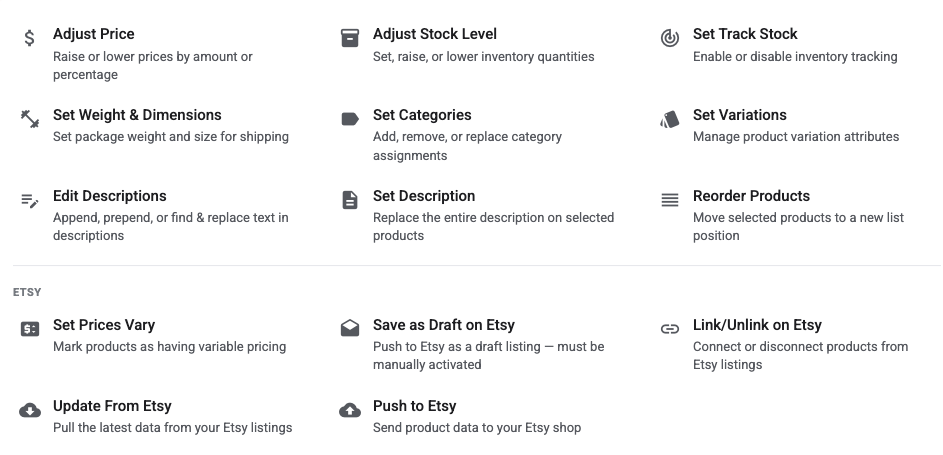
Click More Bulk Actions in the toolbar to see every available operation. Some actions only appear when the feature they belong to is turned on in your store, which is noted below.
Set Price
Give every selected product the same price. Enter the New Price and it becomes the base price on each product.
Products with Prices Vary turned on have no single price to set, so they are left as they are. The dialog tells you how many were skipped. Use Adjust Price for those — it raises or lowers each variation while keeping the differences between them.
Adjust Price
Raise or lower prices across your selected products, and optionally round the results to a tidy ending. Choose a Price Adjustment Method:
- Increase Price by Fixed Amount — Add a dollar amount to each product’s price.
- Decrease Price by Fixed Amount — Subtract a dollar amount from each product’s price.
- Increase Price by Percentage — Raise each price by a percentage (for example, a 10% increase).
- Decrease Price by Percentage — Lower each price by a percentage (for example, 20% off).
Then pick how to round:
- Round Prices — No Rounding, Round Up, or Round Down.
- Price Ending — .00, .95, .99, or Other… to type your own cents, such as .50.
Rounding happens after the price change. A 10% increase on $22.00 gives $24.20; with Round Up to .99 it becomes $24.99, and with Round Down to .95 it becomes $23.95. A price is never rounded down to zero.
To round your current prices without changing them, leave the amount empty and just pick a rounding option.
This change applies to every variation of the selected products, including any price differences between variations. If a product’s variations are priced $20 and $25, a $2 increase makes them $22 and $27.
Adjust Stock Level
Update inventory quantities for your selected products. Choose an Adjustment type:
- Set Stock — Set all selected products to the same stock number.
- Raise Stock — Add a quantity to the current stock of each product.
- Lower Stock — Subtract a quantity from the current stock of each product.
If any of your selected products have variations with their own stock levels, the change applies to every variation. This action also turns on Track Stock for the product if it was not already on. See How to set product inventory on IndieMade.
Set Track Stock
Turn inventory tracking on or off for the selected products with the Track Stock checkbox. When tracking is on, stock goes down automatically as orders come in, and a product can show as out of stock when it reaches zero.
Set Shipping Profile
Assign a shipping profile to the selected products. This action appears only when your store quotes shipping per product. If you have not created any shipping profiles yet, the dialog says so — you create them while editing a product.
Set Weight & Dimensions
Set the package weight and size used to calculate shipping on the selected products. Enter Pounds and Ounces, plus Length, Width, and Height. If your store ships with Japan Post EMS you will see a single Weight (kg) field instead.
Measure the package you’ll mail, not the item itself. Use the size and weight of the box or mailer with the item and any padding inside. That is what the carrier prices postage on.
How to Quote Multiple Items
Choose how shipping is priced when someone orders more than one of a product: Rigid — box grows with each one, Several fit in one box, or Ships in its own box. This action appears when your store uses a shipping method that quotes live carrier rates. Read the full guide at How to Quote Multiple Items.
Set Categories
Manage category assignments for your selected products. Three modes are available:
- Set Categories — Replace all existing categories with the ones you select.
- Add Categories — Add new categories while keeping existing ones.
- Remove Categories — Remove specific categories from the selected products.
Categories are shown as a list with subcategories indented under their parents, and you can select several at once. See Managing Product Categories.
Update Tags
Add or remove the searchable tags that help shoppers find products. Choose Add tags or Remove tags, then type to search your existing tags or create new ones.
Set Options
Apply option templates to the selected products. Choose Set Options to replace the options on each product, Add Options to add to what is there, or Remove Options to take templates off. This action appears when Product Options are enabled in your store. See Product Variations and Options.
Set Variations
Apply variation templates to the selected products. Pick the templates to add from the list. This action appears when Product Variations are enabled. See Variation Templates.
Edit Titles
Change many product titles at once, with a preview before anything is saved. Pick a mode:
- Add to end of title — Append text, such as – Handmade in Vermont.
- Add to beginning of title — Prepend text.
- Find & Replace — Enter the text to Find and what to Replace with. Leave Replace with empty to delete the found text. Check Case insensitive to match regardless of capitals.
Click Continue to preview. You see each product’s title before and after the change, one product at a time, with Previous and Next to step through. Click Edit to go back and adjust, or Apply to All when it looks right.
Edit Descriptions
Works the same way as Edit Titles, for product descriptions: Add to end of description, Add to beginning of description, or Find & Replace. Text you add is written in a rich text editor so it can carry formatting and links.
For Find & Replace, type the words the way they look on your product page. Links and bold text in the middle of the phrase are fine — a match is still found even when part of it is linked or formatted. Click Continue to preview the new description for each product before you Apply to All.
Set Description
Replace the entire description on the selected products with new content. This uses a rich text editor so you can format the text with bold, links, lists, and other styling. Use this when you want all the selected products to share the same description.
Reorder Products
Move selected products to a different position in your product list. The list order determines the order products appear in your catalog. Choose the Desired Position: the first selected product lands there, and the rest follow it as one block.
Search & Replace SEO
Find and replace text in your search engine titles and descriptions. Enter Find this text and Replace with (leave empty to remove the text), and check Match capitalization exactly if you need it. Under Look in, tick SEO Title, SEO Description, or both. Click Preview to see the matches on your selected products before you click Replace.
Etsy Bulk Actions
If you have the Etsy integration connected, an Etsy section appears in More Bulk Actions:
- Set Prices Vary — Mark products as having variable pricing, so each variation carries its own price.
- Save as Draft on Etsy — Create a draft listing on Etsy for each selected product. Drafts are not visible to shoppers until you activate them on Etsy.
- Link/Unlink on Etsy — Connect or disconnect your IndieMade products from their Etsy listings.
- Update from Etsy — Copy your Etsy listings onto these products.
- Update Etsy Listings — Copy these products onto their Etsy listings. Make sure your product data is correct before you push.
See Pushing products to Etsy in bulk and Working with Etsy-Linked Products.
Tips
- Use the search and filter options at the top of your product list to find the specific products you want to edit before selecting them. Filtering by category first makes passes like “all my prints” quick.
- Edit Titles, Edit Descriptions, and Search & Replace SEO all show you a preview first. Use it.
- Bulk actions run as a batch with a progress bar, and the product list refreshes when they finish.
- Bulk actions cannot be undone, so double-check your selection before you apply. Try a small group of products first when you are learning a new action.
- Orders have their own bulk tools. See Bulk Editing Orders.
Questions? Email support@indiemade.com.